Here’s How to Freeze Eggplant So It Lasts All Year

Eggplant is a versatile vegetable that can be enjoyed in many dishes, but its peak season is short. Freezing eggplant allows you to enjoy it all year round. Here’s how to properly freeze eggplant so it retains its quality and flavor for up to 10 months.

Select firm, shiny eggplants that feel heavy for their size. Avoid eggplants with soft or brown spots. Rinse the eggplants under running water and pat dry with a towel. Trim off the stem and any bruises.

Peel the eggplants if desired. The skin can become bitter as eggplant ages, so peeling is recommended for maximum quality. However, the skin also helps the eggplant retain moisture, so leaving it on is fine if you plan to cook the eggplant before eating.

Slice the eggplant into 1/2-inch pieces. Cubes, slices, and halves are all suitable. Uniform pieces will freeze and cook more evenly.

Blanch the eggplant pieces in boiling water. Blanching helps stop the enzyme action that can cause loss of flavor, color and texture. Drop the eggplant pieces into already boiling water and blanch for 2 to 3 minutes until slightly softened.

Immediately plunge the blanched eggplant into an ice bath. Let cool for 2 to 3 minutes until chilled. Drain thoroughly.

Pack the blanched eggplant in an airtight container or heavy-duty freezer bags. Squeeze out as much air as possible before sealing to prevent freezer burn.

Label and date the packages so you know how long the eggplant has been frozen. Properly frozen, blanched eggplant will last up to 10 months in the freezer.

When ready to use, simply rinse the frozen eggplant under cold running water to remove any ice crystals. Pat dry and cook as desired. There’s no need to thaw the eggplant first. Frozen eggplant may become slightly mushy once cooked, so it works best in dishes like eggplant parmesan, ratatouille, and stews. Enjoy your frozen eggplant!

Old Fashioned Onion Rings

Onion rings are a classic American bar snack and appetizer. Thinly sliced onions are battered and then deep fried until golden brown. When done well, onion rings can be irresistibly crunchy and flavorful. However, when done poorly, they end up limp, greasy, and lacking in flavor. Here are some tips for making delicious old fashioned onion rings.

Choose the right onion. Sweet onions, like Vidalias or Walla Wallas, work great for onion rings. They have a mild flavor and high sugar content, so they get very sweet when fried. Large onions will yield bigger rings, so keep that in mind depending on your preferences.Peel the onions and slice them into 1/4-inch thick rings. Separate the rings and soak them in cold water for at least 30 minutes. This will remove some of the harshness from the onions and make them extra crunchy when fried.Make a flavorful batter. A simple batter of flour, egg, beer or buttermilk, and some seasoning is perfect for onion rings. For extra flavor, add some paprika, garlic powder, or chili powder. The batter should be thick enough to coat the onions thoroughly but still drippy.

Heat several inches of vegetable or canola oil in a deep pot or Dutch oven to 350-375 F. Drain the onion rings and pat them dry with paper towels or a clean kitchen towel.

Dip a few onion rings at a time in the batter to coat and then carefully drop them into the hot oil. Fry until golden brown, about 2-3 minutes. Drain on paper towels.

Season the onion rings immediately with salt. Serve them piping hot with your favorite dipping sauces, like ketchup, barbecue sauce, ranch dressing, or chipotle mayonnaise.

Onion rings are best eaten within an hour of frying. For extra crispy onion rings, you can also bread the battered rings in panko or cornflake crumbs before frying. Enjoy your old fashioned onion rings!

How to Cook Chicken From Frozen

Cooking chicken from frozen is easy and convenient as long as you follow a few tips to ensure it turns out moist and flavorful. First, make sure you have plenty of time – cooking frozen chicken can take 50-100% longer than fresh chicken. Thaw the chicken in the refrigerator overnight for the fastest and safest thawing. If you’re in a hurry, thaw the chicken in a bowl of cold water. Change the water every 30 minutes until the chicken is thawed. Make sure the chicken is in an airtight bag and submerged in cold tap water.

As the chicken thaws, prepare your ingredients. For extra flavor, consider marinating the chicken once thawed. You’ll want an oven-safe dish for baking, and a frying pan for browning. Preheat your oven to 375 F. Bring the chicken to room temperature before cooking.

Pat the chicken dry with paper towels. Season all over with salt and pepper, or your favorite spices. For extra crispiness, dredge the chicken in flour, shaking off any excess.

Heat 2 tablespoons of oil in a large skillet (cast iron works well) over medium-high heat. Carefully add the chicken pieces skin-side down. Cook until browned, about 5-7 minutes per side.

Transfer the chicken to a baking dish, skin-side up. Bake until the chicken reaches an internal temperature of 165 F. The total cooking time will depend on the chicken’s size. Tent with foil and continue baking if the skin starts to brown too quickly.

To check if the chicken is done, insert a meat thermometer into the thickest part of the thigh. The juices should also run clear. Let the chicken rest for 5-10 minutes before serving. The temperature will continue to rise slightly as it rests. Enjoy your chicken! With the right technique, cooking frozen chicken can be just as delicious as fresh chicken. Let me know if you have any other questions!

This Is Why Your Tongue Hurts After You Eat Sour Candy

Sour candy might taste great in the moment, but the high acidity can do some damage to your tongue. Sour candies contain citric acid or malic acid, which give them that tart, puckering flavor. These acids activate the pain receptors on your tongue, which leads to the stinging sensation. The acids in sour candy are harmless in small doses, but eating too much at once can irritate your tongue.

The acids in sour candy strip away the protective coating on your tongue called the epithelium. This layer of cells protects the sensitive taste buds on your tongue. When the epithelium is damaged by the acids, your taste buds are exposed to the environment in your mouth. This exposure leads to the pain and sensitivity. The damage is temporary, but it can be uncomfortable for a while.

Your saliva contains bicarbonate, which helps neutralize the acids in your mouth and protect your teeth. But when you eat sour candy, your mouth produces extra saliva to try and balance out the pH. This extra saliva, combined with the damaged epithelium, leads to the swelling and stinging pain in your tongue. The pain should subside once the acids have been washed away and your tongue has healed.

Drinking water or milk can help relieve the stinging faster. These liquids help dilute the acids in your mouth and wash them away from your tongue. Swishing the liquid in your mouth and spitting it out a few times may provide even more relief before swallowing. Avoid brushing your teeth immediately after eating sour candy. Brushing can further damage your already irritated tongue.

The pain from sour candy should only last a few minutes up to an hour at most. If your tongue remains swollen, stinging or irritated for longer than a day, you may have a sensitivity or allergy to an ingredient in the candy. See your doctor if the pain is severe or long-lasting. They can determine if further treatment is needed based on the condition of your tongue.

In the future, enjoy sour candy in moderation and avoid overeating it at once. Give your tongue adequate time to recover between doses of extreme sourness. And remember, the pain is only temporary—your tongue will heal and the sensitivity will fade, though the memory of that tangy sweet and sourness may linger.

How to Grill: Our Top Tips to Make the Best Grilled Meals

Here are 30 paragraphs on the subject of ‘How to Grill: Our Top Tips to Make the Best Grilled Meals’:

Grilling is one of the most popular ways to cook meals in the summertime. There’s nothing quite like the smoky, chargrilled flavor of food cooked over an open flame. However, grilling does take some practice to master. With a few tips and tricks, you’ll be cooking up delicious grilled meals in no time.

First, start with high-quality ingredients. Use fresh, in-season produce and high-quality cuts of meat. Not only will the food taste better, but it will also hold up better on the grill. Delicate foods like fish fillets and shrimp can fall apart more easily. Marinate proteins like chicken, beef, and veggies before grilling to add more flavor. Or brush them with oil and season with salt and pepper.

Next, heat your grill properly. For gas grills, turn all burners to high, close the lid, and let the grill preheat for 10 to 15 minutes. For charcoal grills, light the coals and let them burn until covered with gray ash. You should be able to hold your hand about 6 inches above the grate for just 2 to 3 seconds. The grill is ready when the coals are medium-hot.

Clean your grill grate thoroughly. Use a grill brush to scrape off any burnt-on bits from previous uses. Oil the grate with a wad of paper towels and tongs to prevent food from sticking. Alternatively, rub the grate with an oil-soaked cloth.

Don’t overcrowd the grill. Too much food will cause the temperature to drop, resulting in uneven cooking. Cook proteins in a single layer, not stacked on top of each other. For the best results, cook items of the same thickness and size together.

Flip food only once or twice. Let the food release easily from the grate before flipping. If it sticks, it’s not ready to flip yet. Flipping too frequently will cause food to dry out. An exception is shrimp, scallops and vegetables which may need to be flipped more often.

Check for doneness and use a food thermometer when necessary. The best way to check if chicken, burgers, and steak are done is to use a food thermometer. Fish will flake easily with a fork when ready and veggies will be tender-crisp.

Let the food rest before serving. Let grilled meats, chicken and fish rest for 5 to 10 minutes before cutting and serving. This allows the juices to redistribute and helps the food retain moisture. The internal temperature will also continue to rise slightly as it rests.

A Month of Budget Slow Cooker Meals for Four People

Slow cookers are a budget-friendly way to make hearty, homemade meals. For about $30, you can purchase a basic slow cooker to make delicious one-pot meals for a family of four. Here is a month’s worth of budget-friendly slow cooker recipes to feed a family of four:

Chicken noodle soup is a classic, comforting dish that’s perfect for a slow cooker. Place four bone-in, skin-on chicken thighs, an onion, three carrots, three celery stalks, parsley, thyme, bay leaves, salt, and pepper in a slow cooker. Cover with low-sodium chicken broth and cook on Low for 6-8 hours. Remove chicken, shred with two forks and return to the pot. Add egg noodles and cook until tender.

For beef stew, cube one pound of beef chuck roast and place in a slow cooker with potatoes, carrots, celery and onion. Add broth and spices like rosemary, parsley, thyme, and bay leaves. Cook on Low for 8 hours. The beef will become very tender. Serve the hearty stew with crusty bread.

To make chili, brown one pound of ground beef with onion and garlic, then add to a slow cooker along with kidney beans, diced tomatoes, corn, and chili spices like cumin, oregano, basil and chili powder. Cook on Low for 6-8 hours. Top with cheese, scallions, avocado, or cornbread.

For BBQ pulled pork, place a 3-4 pound pork shoulder roast in a slow cooker and cover with your favorite BBQ sauce. Cook on Low for 8 hours or until the pork is falling apart. Shred the pork with two forks and mix with more BBQ sauce. Serve on buns with coleslaw.

To make Irish beef stew, place 1-1.5 pounds of stewing beef, potatoes, carrots, onion, and broth in a slow cooker. Add Guinness beer and spices like rosemary, thyme, parsley, and bay leaves. Cook for 8 hours on Low. The beef will become melt-in-your-mouth tender in the rich, flavorful stew.

How to Season a Cast Iron Skillet

Cast iron skillets are popular among home cooks and professional chefs alike for good reason. Cast iron distributes heat evenly, lasts a lifetime, and imparts a subtle flavor to foods. However, before you can enjoy cooking with cast iron, you need to season it. Seasoning a cast iron skillet creates a natural, slick coating that prevents food from sticking and protects the iron from rust. Here’s how to properly season your cast iron skillet:

To start, wash your new cast iron skillet with hot, soapy water. Rinse and dry it completely. Apply a thin coat of melted shortening, lard, or vegetable oil to the entire pan, including the handle. Use a paper towel or cloth to spread the oil evenly over the surface.

Place aluminum foil on the bottom rack of your oven to catch any drips. Put the oiled pan upside down on the top rack. Place a baking sheet or aluminum foil on the rack below to catch drips.

Preheat your oven to 350 F. Once preheated, put the pan in the oven for about an hour. After an hour, turn off the oven and let the pan cool completely.

Remove the pan from the oven and wipe away any excess oil with a paper towel. Your pan is now seasoned and ready to cook with. The natural coating created during seasoning will continue to build up over time and use.

To maintain the seasoning, avoid washing the pan with soap as much as possible. Simply rinse with hot water, scrub out any stuck bits with coarse salt and a brush, then dry completely. Apply another thin coat of oil before storing.

Over time, your cast iron skillet will become increasingly non-stick. The more you cook in it, the better the seasoning will get. You may need to re-season every few years or if the coating starts to look dull or patchy. Avoid acidic foods like tomatoes, citrus and wine until you’ve built up a good layer of seasoning.

With regular use and proper care, a well-seasoned cast iron skillet can become a naturally non-stick pan and a treasured kitchen tool that will last a lifetime. Happy cooking!

Instant Pot Carnitas

The Instant Pot has revolutionized home cooking, making it easy to create delicious meals with little active cooking time. One of the most popular Instant Pot recipes is Instant Pot carnitas. Carnitas is a Mexican dish of braised and shredded pork, usually shoulder. The Instant Pot’s ability to braise meat in a short amount of time makes it ideal for carnitas.

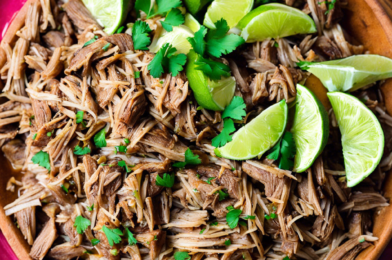
To make Instant Pot carnitas, you will need a 3 to 5 pound pork shoulder roast, sliced into 2 to 3 inch pieces. Season the pork all over with salt, pepper, cumin, oregano, and chili powder. You can also add minced garlic for extra flavor. Add some oil to the Instant Pot and brown the seasoned pork pieces on all sides, about 5 to 7 minutes per batch. As the pieces are browned, remove them to a plate and set aside.

Once all the pork has been browned, add the pieces back to the Instant Pot. Add enough chicken broth to come up halfway up the sides of the pork. Lock the lid in place and set the Instant Pot to high pressure for 60 to 90 minutes, depending on how tender you want the meat. The longer cooking time will result in more tender carnitas.

When the Instant Pot beeps to indicate it has finished cooking and has depressurized, remove the lid. Use two forks to shred the pork inside the Instant Pot. At this point, you can drain off some of the excess liquid for carnitas with a drier texture. You can also mash some of the garlic cloves into the shredded pork.

To serve, pile the carnitas onto tortillas, nachos, tacos, or burritos and top with salsa, guacamole, cilantro, lime wedges, and any other desired toppings. The carnitas can be stored in an airtight container in the refrigerator up to 1 week. They can also be frozen for up to 3 months.

Instant Pot carnitas are tender, flavorful, and perfect for any Mexican dish or as a topping for salads. The Instant Pot makes the cooking process hands-free and easy. Your home will be filled with the irresistible aroma of the spices and braised pork. Instant Pot carnitas are sure to become a family favorite!

This Meat Cooking Myth Could Actually Do More Harm Than Good

Cooking meat until there’s no pink left is a common rule of thumb, but it could actually do more harm than good. New research shows that overcooking meat may increase the risk of disease and reduce nutritional value.

According to the USDA, meat such as beef, pork, and lamb should be cooked to an internal temperature of at least 145 degrees Fahrenheit or 63 degrees Celsius. At this temperature, meat is considered “safe” to eat. However, cooking meat beyond this point provides little benefit and can actually introduce harmful compounds.

When meat is overcooked at high temperatures, compounds called advanced glycation end products (AGEs) form. AGEs are harmful molecules that are linked to increased inflammation and the risk of disease. Eating too many AGEs from overcooked meat has been tied to a higher risk of diabetes, heart disease, and some cancers.

Overcooking meat can also reduce its nutritional value. Meat contains many B vitamins, iron, zinc and other minerals — and many of these nutrients start to break down at high cooking temperatures. In some cases, overcooking meat may reduce its nutrient content by up to 50 percent.

While foodborne illness is a concern, especially for young children, pregnant women, older adults and people with weakened immune systems, the risks are often overblown. According to recent estimates, only about 1 in 10,000 meals results in foodborne illness. Properly cooking meat to the recommended internal temperature kills bacteria like E. coli and Salmonella and makes the meat safe for most people to eat.

Some tips for cooking meat without overdoing it:

•Use a meat thermometer to check that the internal temperature reaches the proper level. For most meats, 145 F is sufficient.

•Let the meat rest for 5 to 10 minutes before cutting or serving. The internal temperature will continue to rise slightly as it rests.

•Choose cooking methods that don’t require high, direct heat, such as braising, stewing, or slow cooking in a crockpot. These gentle cooking methods minimize the formation of AGEs.

•Don’t overcrowd the pan when cooking meat. Too many pieces of meat in the pan lowers the temperature and results in overcooking.

•For grilling or pan-searing, keep a close eye on the meat. These high-heat methods require frequent flipping and removal from the heat source to prevent overcooking.

•Consider eating less meat and more plant-based sources of protein. Not only does this reduce health risks associated with overcooked meat but it is also better for the environment.

Most nutrition experts agree that eating some unprocessed red meat in moderation can absolutely be part of a healthy diet. However, how the meat is cooked plays an important role in both its nutritional value and potential health effects. Following a few simple tips to avoid overcooking meat may help you improve the overall quality of your diet and reduce health risks. Moderation and balance are key.

The Best Easy Cake Recipe Doesn’t Even Require Measuring Cups

This cake recipe is for those of us who don’t want to drag out the measuring cups for a simple sweet treat. All you need is a few basic ingredients and a little bit of patience as the cake bakes. The result is a light, fluffy vanilla cake that tastes like it came from a bakery.

For this recipe, gather flour, sugar, baking powder, salt, milk, eggs, vanilla extract, and vegetable oil. You’ll also want to preheat your oven to 350 F.

In a large bowl, whisk together the dry ingredients: 2 cups flour, 1 1⁄2 cups sugar, 2 teaspoons baking powder, and 1 teaspoon salt. Make a well in the center and add the wet ingredients: 1 cup milk, 2 beaten eggs, 1/4 cup vegetable oil, and 1 teaspoon vanilla extract.

Use a wooden spoon to stir until just combined, being careful not to overmix. The batter should be slightly lumpy. Pour into a greased 9×9-inch baking pan.

Bake for about 30 minutes, until golden brown on top and a toothpick inserted into the center comes out clean. Allow to cool completely before frosting and enjoying.

The simplicity of the recipe means you can easily double or triple the batch for a larger crowd. You can also add mix-ins to jazz it up, like chocolate chips, berries, or nuts. Enjoy!